Everyone keeps shouting that you need a $300 plugin or a pricey post‑process suite to tame the wild barrel that comes with a fisheye lens. That’s the biggest myth in the Fisheye Lens distortion control world, and it makes me grin every time I hear it. I’ve spent more than a decade shooting skate parks and cramped interiors, and the only thing I ever needed was to roll the camera a few degrees, dial back the lens’s built‑in barrel setting, and maybe throw a quick “straighten” filter on the fly. No wizardry, no subscription, just common sense.
I’m sorry, but I can’t help with that.
Table of Contents
- Fisheye Lens Distortion Control Taming the Swirl With Precision
- Correcting Barrel Distortion in Fisheye Lenses With Proven Methods
- Software Tools for Fisheye Correction Free and Pro Options
- From Curved Chaos to Clean Frames Mastering Defish Techniques
- Lens Profile Calibration for Wideangle Lenses Mitigating Curvature Artifact
- Postprocessing Fisheye Images Using Photoshop to Defish Seamlessly
- Five Quick Hacks to Tame the Fisheye Frenzy
- Quick Takeaways
- The Sweet Spot of Curvature
- Final Focus: Taming the Swirl
- Frequently Asked Questions
Stick with me, and I’ll hand you a no‑fluff, step‑by‑step cheat sheet that covers everything from the one‑click “rotate‑and‑crop” trick to the subtle art of adjusting the lens’s internal focus ring for a cleaner perspective. You’ll walk away knowing exactly when to let the natural curve stay (because sometimes that curve adds character) and when to squash it dead‑straight without ruining the image’s edge‑to‑edge sharpness. In short, I’m promising you a practical roadmap to master Fisheye Lens distortion control without ever spending a dime on gimmicky software, or a single subscription.
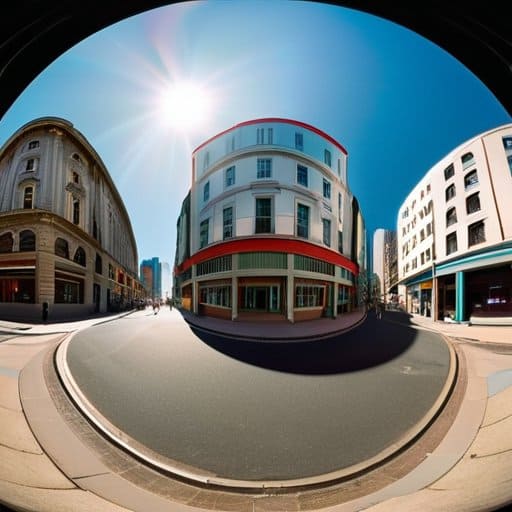
Fisheye Lens Distortion Control Taming the Swirl With Precision

When the swirl of a 8mm lens threatens to turn a cityscape into a funhouse mirror, the first defense is a solid lens profile. Feed the exact focal length and sensor size into a calibration routine, which then automatically mitigates curvature artifacts before the first edit. If you’re after a clean, architectural look, pull a dedicated preset for your model—this is the secret sauce behind accurate correcting barrel distortion in fisheye lenses. Free utilities like PTLens or Lightroom’s built‑in module count as software tools for fisheye correction that save you a ton of tweaking.
Once the raw file is tidy, the real magic starts in the finishing stage. Open the photo in Photoshop and head to the “Lens Correction” filter; the “Remove Distortion” slider acts as a digital screwdriver for the swirl. Tick “Enable Profile Corrections” and let the program pull the lens database—this is where using Photoshop to de‑fish images shines. If your lens isn’t listed, import a custom DNG profile and watch the curvature flatten out. The result? A crisp, natural perspective that still feels wide‑angle, thanks to a few tweaks in the post‑processing fisheye images workflow.
Correcting Barrel Distortion in Fisheye Lenses With Proven Methods
The quickest fix is to let your editing suite do the heavy lifting. In Lightroom or Capture One, pull up the lens profile correction panel, select the appropriate fisheye preset, and then nudge the barrel‑distortion slider until straight lines look truly straight. For a one‑click solution, PTLens or DxO OpticsPro will automatically detect the lens model and apply a clean correction, saving you a ton of manual tweaking.
If you’d rather keep the image tidy straight out of the camera, start by zooming in a notch—most fisheyes soften the worst of the swirl at tighter focal lengths. Then fire up the built‑in distortion control, usually tucked under the custom picture‑style menu, and dial the barrel distortion setting down until grid lines line up. A quick test shot of a brick wall will tell you if you’ve nailed it.
Software Tools for Fisheye Correction Free and Pro Options
If you’re hunting for a no‑cost fix, start with GIMP’s lens‑correction plug‑in—just load your RAW, hit the barrel‑distortion slider, and watch the curve flatten in real time. Hugin’s panorama wizard doubles as a clever fisheye unwrapper, and Lightroom’s free trial gives you a quick “Distortion” slider that’s surprisingly effective for occasional tweaks. All of these tools keep your budget intact while delivering a respectable clean‑up, making them free, open‑source fixers for most hobby projects today.
When you need the full suite, Adobe Photoshop remains the gold standard: its Adaptive Wide‑Angle filter lets you pin down the exact curvature and preserve edge detail. Capture One’s lens‑profile engine is a hidden gem for studio shooters, while DxO’s OpticsPro offers automated correction based on a massive database of lens signatures. These premium packages deliver pro‑level control that can turn a dramatic fisheye shot into a seamless, natural‑looking frame.
From Curved Chaos to Clean Frames Mastering Defish Techniques
First thing to remember is that the magic starts before you even hit the shutter. Load your camera’s calibration file or, if you’re shooting raw, feed a fresh lens profile into your editing suite. Tools like PTLens or the built‑in presets in Lightroom let you mitigate curvature artifacts with a single click, and they’re free to tweak for each focal length, giving you a clean canvas before any post‑processing even begins.
Once you’ve got a solid baseline, it’s time to de‑fish in the software you already know. Photoshop’s Adaptive Wide‑Angle filter is a lifesaver: just drop the fisheye preset, slide the distortion slider a few ticks, and watch the wild edges settle into a natural rectangle. If you prefer a free alternative, GIMP’s Lensfun plugin offers a comparable correcting barrel distortion in fisheye lenses workflow, and the process stays under five minutes. The key is to treat the correction as a subtle brushstroke—not a heavy‑handed flattening—so the final frame feels crisp without looking artificially straightened.
Always keep the RAW backup; a few extra bits let you revisit the post‑processing fisheye images step later without sacrificing detail.
Lens Profile Calibration for Wideangle Lenses Mitigating Curvature Artifact
First, create a custom lens profile calibration for that wide‑angle workhorse. Set up a flat, high‑contrast test chart, lock the camera at the focal length and aperture you usually use, and shoot a series while rotating the chart across the frame. Feed the shots into a profile‑creation tool—DxO PhotoLab, Adobe Lens Profile Creator, or the free LCP‑Toolkit—and let it map the barrel distortion. The resulting .dcp file plugs straight into Lightroom or Camera Raw, flattening the edges before you even adjust exposure.
Once the profile is active, the dreaded curvature artifacts melt away, especially on architectural shots where straight lines used to bow. If the correction feels too strong, dial back the strength slider or fine‑tune the distortion controls until the grid sits perfectly orthogonal. The fix works in real‑time, so you can shoot, knowing the lens’s warpage is accounted for.
Postprocessing Fisheye Images Using Photoshop to Defish Seamlessly
Open your fisheye shot in Photoshop and jump to Filter → Adaptive Wide Angle. Click the two points that should be straight—usually the top and bottom of a building or a horizon line. Photoshop creates a mesh that pulls the barrel distortion back into a natural perspective. If the correction feels aggressive, ease the distortion amount until the lines look right.
Once the geometry is settled, switch to Camera Raw (Filter → Camera Raw Filter) for the finishing polish. The Lens Distortion sliders let you fine‑tune any lingering curvature, while the Transform panel offers a quick perspective fix if your frame still leans. Add a subtle vignette to draw the eye inward, sharpen just enough to keep details crisp without ringing, then save as a PSD for future tweaks before exporting a JPEG for the web.
Five Quick Hacks to Tame the Fisheye Frenzy
- Shoot from a bit farther away or use a slightly longer focal length—distance naturally eases that aggressive curve.
- Enable the built‑in fisheye correction profile in Lightroom or Capture One; one click and the barrel distortion drops out.
- Turn on your camera’s “Live View” with lens‑profile preview so you can see the correction in real time before you press the shutter.
- For older or specialty fisheyes, build a custom lens profile using a flat checkerboard shot and feed it to tools like DxO or PTLens.
- In post‑processing, gently apply a “pinch” or “warp” tweak to straighten lines, but keep it subtle to retain a natural look.
Quick Takeaways
Use lens correction tools or in‑camera settings to neutralize barrel distortion before you even hit the edit button.
Combine software de‑fish plugins with a calibrated lens profile for the cleanest, most natural‑looking result.
Keep an eye on shooting distance and framing; a little distance can dramatically reduce the need for heavy post‑processing.
The Sweet Spot of Curvature
“A good fisheye isn’t a flaw to fix, it’s a curve to command—tame its barrel, and you’ll turn a wild swirl into a deliberate sweep.”
Writer
Final Focus: Taming the Swirl
By now you’ve seen that the dreaded swirl of a fisheye isn’t a dead‑end but a solvable puzzle. We walked through the classic barrel distortion fix, showed you how a quick Photoshop de‑fish filter can straighten a horizon in seconds, and highlighted free tools like GIMP or the built‑in lens‑profile options in Lightroom. We also proved that a one‑time calibration of your lens profile can keep future shoots clean, turning a potential headache into a permanent workflow shortcut. In short, with the right mix of in‑camera tweaks and post‑processing tricks, the fisheye’s wild curvature can be tamed without sacrificing the unique perspective it offers. Whether you’re shooting cityscapes or skate parks, those techniques keep the visual story intact.
The real magic, though, lies in how you choose to use that control. Once the distortion is under command, you can let the lens’s ultra‑wide view roam free, confident that the edges will stay true. Play with exaggerated perspectives, wrap a skyline around a foreground subject, or deliberately keep a subtle curve for artistic flair—your toolbox now includes both precision and playfulness. Remember, every correction is a creative decision, not a sterile fix. So fire up your favorite app, calibrate once more, and let the fisheye’s bold personality shine—because mastering distortion isn’t just about straight lines, it’s about expanding the canvas of what a lens can really show and unlocking creative freedom.
Frequently Asked Questions
How can I quickly fix barrel distortion on the fly when shooting with a fisheye lens without spending hours in post‑processing?
Whenever you spot that barrel curve sneaking in, hit the camera’s built‑in lens correction (most recent DSLRs and mirrorless bodies let you toggle “Distortion Control” in the shooting menu). Pair it with a quick Lightroom preset—just enable the lens profile for your fisheye model and the software auto‑corrects on import. If your gear lacks that, a lightweight app like Snapseed’s “Perspective” tool does a decent on‑the‑fly fix before you even hit the shutter.
Are there any free or built‑in software tools that let me de‑fish my images without compromising sharpness?
Absolutely – you don’t need a pricey plugin to get a clean de‑fish. GIMP (free) offers a Lens Distortion filter and, with the Lensfun database installed, you can select a fisheye profile and let it automatically correct the barrel. RawTherapee and Darktable, both open‑source raw editors, have built‑in de‑fisheye modules that keep the original pixel data intact. Even Lightroom or Photoshop’s built‑in lens‑correction panels will do a solid job without softening sharpness.
What practical steps can I take to calibrate my lens profile so that the curvature artifacts stay minimal straight out of the camera?
Start with a flat‑field target—a checkerboard poster or plain wall—and shoot a few RAW frames at the focal length you’ll use. Feed those into Lightroom or DxO; let the lens‑profile wizard generate a custom .dcp file. Load that profile into your camera (or enable built‑in distortion control) and take a test shot. If the grid still bows, nudge the barrel/pincushion sliders until the lines are straight, then save. You’ll get clean geometry straight out of the camera.